Be aware that those information are for OVA deployments on ESXi Server only. Avaya has announced to allow IPO to be virtualized on Microsoft Hyper-V, KVM and Amazon Web Services (AWS) with the release of R10.1 but that is not covered here.
The challenge
Avaya publishes a deployment guide for virtualized IP Office server for every release containing information about the needed memory and CPU resources. They also tell us what size the hard disk has to have based on the number of users. That is important because the OVA image by default has a disk size of 100GB. If the server has to handle more users you will also need a bigger hard disk. Another reason for increasing the disk size can be to use the IP Office server as backup target for the whole Server Edition solution. The backup task checks that there is enough disk space available to start the backup. Based on Avaya’s documents there has to be 60GB free disk space available if Voicemail Pro is not installed and 120GB if it is installed. If there isn’t enough space the backup will fail.
So you see the issue? The OVA comes with a 100GB disk but needs 120GB free disk space for backups…
The following steps are based on this document: Deploying Avaya IP Office™ Platform Servers as Virtual Machines
Implementation
Let’s guess we have successfully deployed the OVA image with it’s default hard disk size of 100GB but need more space to either be able to handle more users or to be able to use the server as a backup target.
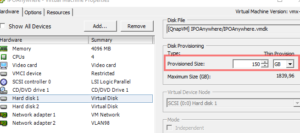
As far as there are no active snapshots in the virtual machine we can just go on and shut down the server and start the vSphere client. To adjust the hard disk go into the virtual machine’s properties and click on the hard disk. Within the details pane there will be the option to adjust the hard disk size. I will add 50 more gigabytes to have a hard disk of 150GB later on. Click OK to save the settings. To get the following screenshot I added another 20GB so don’t be irritated that the screenshots show that the disk will be increased from 150GB up to 170GB.

Increase hard disk size with vSphere client
After starting the virtual machine again we have to open the IP Office WebControl interface under https://<IP of server>:7071. In the ‘system’ area under the ‘settings’ tab you will find a section called ‘Increase root partition’ with a hint that 50GB more space is available to allocate. Just click the available button to start the process. You will get a warning that during the process the server will reboot. So go and get a fresh cup of coffee…
Button to increase root partition in WebControl
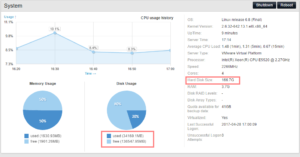
When the reboot is done we can check within the WebControl interface that we now have a much bigger hard disk. Well done!

WebControl shows increased hard disk size
Conclusion
As you can see the steps to increase the hard disk size of a virtualized IP Office server are pretty easy. Just be aware that you joule do the steps either directly after deploying the OVA image or plan a maintenance window to do those steps. The server has the reboot twice to recognize the unpartitionized disk space and to do the process of increasing partition itself.
In a further post I will cover the steps how to enable the inbuilt HTTP server to be able to use the IP Office server to store backups.
If the hard disk is big enough now have look at this follow up post: How to backup IP Office servers
If you need further help with IP Office you can contact me through my main website: https://www.fwilke.com/home
Do you want to get information about new posts? Subscribe to my Newsletter