The challenge
Did you ever ran into the situation where IP Office hardware died and you had to replace it? And in that situation did you have an actual backup available? For a single site IP500 there are many places to get a backup. If the chassis breaks you will have a backup on the SD card – in the case you will not find a non V2 chassis. If the SD card breaks the running config is stored in the internal flash of the chassis. If you don’t have both of them you will probably have an older config file stored in your Manager folder on your computer.
Considerations for Server Edition solutions
But what about IP Office servers? First of all there is more to save than just the IPO configuration. We have Voicemail Pro and OneX Portal. We probably have contact store and WebLM as well as WebRTC and it’s getting more with every release.
If only the hard disk of the secondary server or of a Linux expansion system dies you will have a good chance to find the IPO configuration somewhere on primary server. Voicemail will be synchronized from there. So the risk is not the biggest.
But what if the hard disk of the primary server gets damaged? OneX Portal usually runs only on primary server and is not synchronized in any way to another server. Voicemail Pro on primary server is the master and weil push it’s config to secondary server if possible. So the stand by Voicemail Pro will be overwritten. And what about IP Office itself? With a bit of luck you will find an older config on your computer.
The solution
So what do we need? We need an automated backup task that runs every day and to avoid losing the backup caused by a broken hard disk we need it twice.
Luckily Avaya gives us the opportunity to schedule backups. And sadly they are – in my opinion – not very clear in their documentation how to do it and how to restore in case of an issue.
Interestingly Avaya offers to backup to HTTP and HTTPS servers but also to FTP and SFTP. Good to know to have different options and installation of some of the well known free FTP servers on Windows is straight forward. Additionally anonymous login is quite simple or to create a FTP user is not that much work. The frustration will follow soon if you see the message that IP500V2 expansions are only able to store their backups to HTTP and HTTPS servers.
The implementation
So following the guides from Avaya (Administering Avaya IP OfficeTM Platform with Web Manager) only an IP Office server should be used as a backup target. It doesn’t matter if it is a primary or secondary server, an application server or a Linux expansion system. You can also deploy an application server with Voicemail Pro and OneX Portal services disabled and use it only to store backups. The only thing you need is to have enough free space on it’s hard disk. All hardware server’s hard disks are big enough but virtualized servers only come with a 100GB disk that has to be increased to get more free space.
I already wrote another post describing the steps to increase the disk size of those virtual servers. Look here: Increase hard disk size of virtualized IP Office
Guessing our disk is big enough let’s start now with the following steps:
- Enable HTTP backup storage
- Create a remote server for backups within the solution
- Do an immediate backup for testing
- Create a scheduled task to do daily backups
Enable HTTP backup storage
First we need to prepare the server to be able to store backups. Quite simple because there is a check box in WebControl (https://<serverIP>:7071). You will find the box under the ‘System’ section in the ‘Settings’ tab. It is named ‘Enable HTTP file store for backup/restore’.
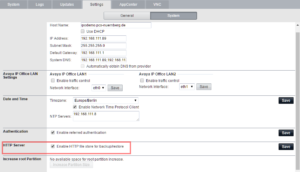
Check box to enable HTTP file store
After enabling the HTTP server it will be reachable under predefined path and port settings. The following table shows the path and ports that can be used to store backups for each available file transfer service.
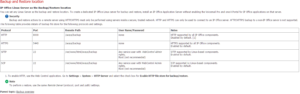
List of backup and restore locations on IP Office servers (klick to open doc)
Create a remote server within the solution
HTTP(S) is a client and server service. In the last step we activated the server side and now we also need the client side to be set up.
I guess in almost every installation we use some kind of private network (LAN, VPN, MPLS) between the IPOs and the backup server so that the use of HTTP is okay and easier to implement. If the backup storage is located in a non trusted network using HTTPS together with a password is strongly recommended. With HTTPS you have to ensure to have valid and trusted certificates in place.
Let’s go on with HTTP. The definition of the backup storage is done once for the solution and not individually for each node. I don’t have to mention that all nodes have to reach the backup server. As long as we use the primary or secondary server that should not be the problem. If the server is located in another location you have to check correct routing or you have to help yourself by implementing some kind of a proxy service or NAT.
To define a remote server you have to login into WebManagement under https://<serverIP>:7070 and hit the button ‘Solution Settings’ at the top right corner and chose the option ‘Remote Server’.
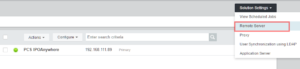
Open the remote server management
We have to enter details of or backup server now. Based on the table above the server configuration should look like this:
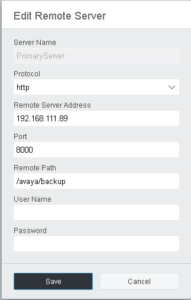
Server details of an iP Office backup server
After saving the server details we should go back to the solution page to test what we did.
Do an immediate backup for testing
After configuring all the needed settings we should test if all is correct. You don’t want to configure a daily backup without knowing if it really works or not.
So let’s go to the solution page and configure a backup job. We have to check the needed parameters:
- What system or systems do we want to backup?
- What services do we want to backup?
- What is the target server?
- Should it run immediately or scheduled?
- Do we want to backup only once or on a regular basis (daily, weekly, monthly)?
For testing we should backup all available machines with all available services once. We can create a daily job later.
On the solution page every single node has a checkbox in front of it to chose it for the next action. In the header line there is another checkbox to enable all nodes checkbox in one step. Because we want to backup all servers that’s the option we want to use.
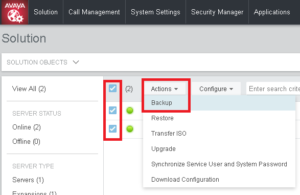
Chose nodes to backup
You will see the backup configuration page which will list the nodes to backup at the top. Followed by the sets of each service you can chose to backup.
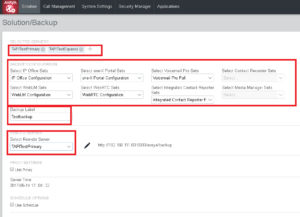
Select what services you want to backup, a label and the target machine
Next you should define a label for that backup job. In this case just use somethin that reflects the reason for that backup (it is as test…). That label will be visible in the case you need to restore a machine from that backup.
Optionally there is an option to schedule when the backup should be done and if it should be recurring. In our case we just want to do just a one time backup for testing. We will have a quick look at the scheduler later.
So let’s start the backup now. WebManager will redirect us to the solution page and shows a bubble that the backup is prepared. A little later you should see the backup status for each node and a confirmation that the backup did complete successfully. I feel you are curious you can’t browse the backup directory on the target server with WinSCP or any other SFTP client. The backup files will be located under /var/www/html/avaya/backup.
Scheduling a dails backup job is not a big deal. Just keep immer mind that the backup jobs check the existing backup sets and will always keep the last fourteen sets of backups. Older backups will be deleted. Even if you schedule backups on a daily base you will have backups of the last two weeks available. To keep more backups – perhaps you want to externally store weekly or monthly backups for a longer time – you can copy the existing backup sets to another machine. I plan to have another post how to accomplish that with free tools on a Microsoft Windows machine. My preferred tools are Powershell to write a script and the WinSCP command line to pull the needed files.
The way to go o schedule a daily backup is the same as within our test before with the schedule options additionally set.
Check the nodes to create a backup from, define the sets to backup, enter a label, chose the target server. At the bottom of the backup configuration screen there is a checkbox called ‘Use Schedule’.
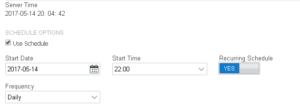
Settings to schedule an IP Office backup job on a recurring basis.
As you can see you can define the start date and time. You can also define if the schedule should be recurring on a daily or weekly or monthly base.
Conclusion
As stated above backups are important. As long as everything is running fine most engineers are sure that everything will go on working as expected or even if they are not sure they don’t think about the situation they will find if something breaks though. We learned it the hard way when a hard disk of a smaller IP Office rack server broke.
I hope I was able to illustrate all the needed steps to configure backups of IP Office nodes that are part of a Server Edition solution. I personally like shorter posts more. This time I wanted to mention all the needed details causing this long text. Feel free to comment this post if you like it or if you have additional questions.
And don’t forget… The most important backup is the one you don’t have!
If you need further help with IP Office you can contact me through my main website: https://www.fwilke.com/home
Do you want to get information about new posts? Subscribe to my Newsletter